Friday, May 28, 2010

In the Corner...

Whilst wandering the Melbourne environment, rubbings of interesting textures were made. These textures were then recreated through drawing them within the spaces created by over lapping circles.

From these drawings the textures where then brought back into three dimensions through the use of collage and perspective drawing. The outcomes of the collages are pictured below.


In some cases, the negative spaces was enhanced by cutting away areas of the page.


Next a corner within the room was selected (in this case the curve created by the back-rest and leg of a chair) and recreated in thick cardboard joined together with masking tape.


returning the the texture collages for inspiration, a second 3D element was created. The form is made from wax and the same thick cardboard. It takes the shape reminiscent of a caterpillar with exceedingly well defined dorsal segments.


As can bee seen, the creature has been placed inside the reproduced corner, lurking almost out of sight.


This placement evokes a slightly paranoid feeling. the same feeling induced by the memory of groping around in the dark for the light switch, only to discover instead something unexpected, hairy and oddly squishy, something scarily unidentifiable and.....Alive.

Wednesday, May 26, 2010

Step Two: Linear Destination

Bring the newly drawn object from step one into three dimensions.

Choose a material which is at least 4mm thick, one or more methods of joining as needed. Choose pigments which are the same as those used in the final drawing.
Add to your list of colours the same colour as the square of paper. This MUST be incorporated into the object.
Begin constructing the 3D object.


In this case the paper itself was glued onto the object.


Build up the thickness and shapes of the object as feels natural, let it grow.


Experiment with carving, sanding, cutting, breaking and creating different textures.


Once you are happy with the form, Begin adding colour.


Experiment with different thicknesses and transparencies of colour. Try creating depth with artificial shadows and highlights.


Remember to pay attention to the back/bottom of your object.

Once complete, step back and enjoy the final product.
Start to look for new forms implicit within the new object. They may spark off the creation of a new piece.
Tomorrow, try drawing the object you have just created, following the same steps you have just completed.


Step one: Linear Journey

Stating with something Broken....such as a Comb all twisted and bent.
Draw the object on a piece of A3 using a black pen and the blind contour method. Take no more than 7 minutes.


Next, draw it as a continuous line drawing never taking your pen off the page. Take 7 minutes to complete.


Set up a second broken object, near to the first on a coloured square of paper. Go on to draw the second object, on the same page, beginning from the point at which you finished the first. once gain use the continuous line method and take no longer than 7 minutes to finish.


Next find nine objects which contain different examples of line; physical or graphic.
Draw each as faithfully as possible, using colour as well as the same black pen. Spend one and a half hours on this part of the exercise.


Staring on a fresh page.
Take elements and inspiration from the previous drawings, continue on to draw and/or paint a new object. Let the new object appear naturally without attempting to take too much control over the outcome.


Continue on to Step Two.

Multiplicity

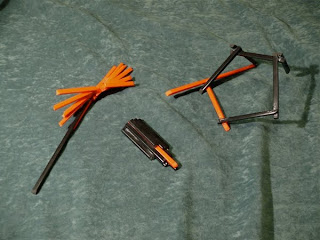
The models below are a quick exploration of the possibilities and limitations of plastic chopsticks. How they responded to being cut, broken, carved, glued, scratched and bent.
The nature of the material is one of identical repetitive form and shade of colour. This lends itself to a design based on the strengths of the material. The shape of each chopstick made it ideal for stacking, layering and creating frames and repetitive forms.


Informed by the models, pictured above, the three variant designs for a necklace featured below respond to the themes of the multiple and repetition and to a need for wearability. They are designed to be made from the same plastic chopsticks as the models, once again playing to the strengths of the material.


The process of making will be very similar to the making of the moquettes too, involving, mainly glue as the method of joining. This will be coupled with silver or stainless steel links to provide movement and allow the necklace to mould to the wearer's body.


Strange Fruit

Using the Cohesive fragment collage drawings as inspiration, we created a 3D Object, once again using materials found in office supply shops.


The object is a fruit. Real or imaginary. They are worn as brooches.


This example hangs off the wearer, through a button hole, off the collar of a shirt.


The shadows cast by this piece are an integral part of the brooch, bringing an ephemeral quality to it. Also as the shadows move in conjunction with the changes in light source, they impart a sense of the time elapsed during the ripening period of the strange fruit.


Cohesive Fragments

We began this drawing exercise by cutting photocopied images of historical art objects and silversmithing pieces, into 20 x 20mm squares.
These were then selected and arranged into a new configuration, combining elements of both photocopied objects. These were then glued to the page.


On a New page, we then ruled up 40 x 40mm squares in the same configuration as our chosen photocopied elements.


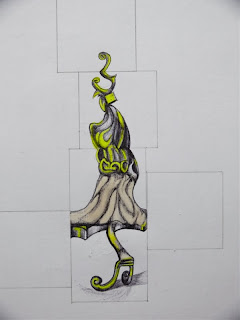
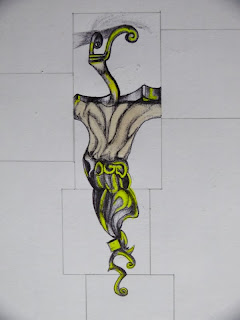
Next we set about recreating the elements, as faithfully as possible, as seen in the collage arrangement, further editing as we went along. We used common office materials such as ball-point-pen, masking tape and highlighters in the creation of these collage drawings.


What emerged proved to be organic, sculptural, unique and surprising images, with three dimensional elements, both actual and implied.


The images often had no clear orientation to either the vertical or horizontal.


This image depicts the drawing at the half-way point to completion. As you can see the sections are still distinct from each other, prior to the blending seen in the final cohesive collage drawing.